原文地址:How to Do Visual Regression Testing in Vue with Vitest?,作者是Alex,一位来自德国的开发人员。在 25 年的 Vue Nation 上有演讲。作者在 X 上很活跃,有条件可以去那里看看。
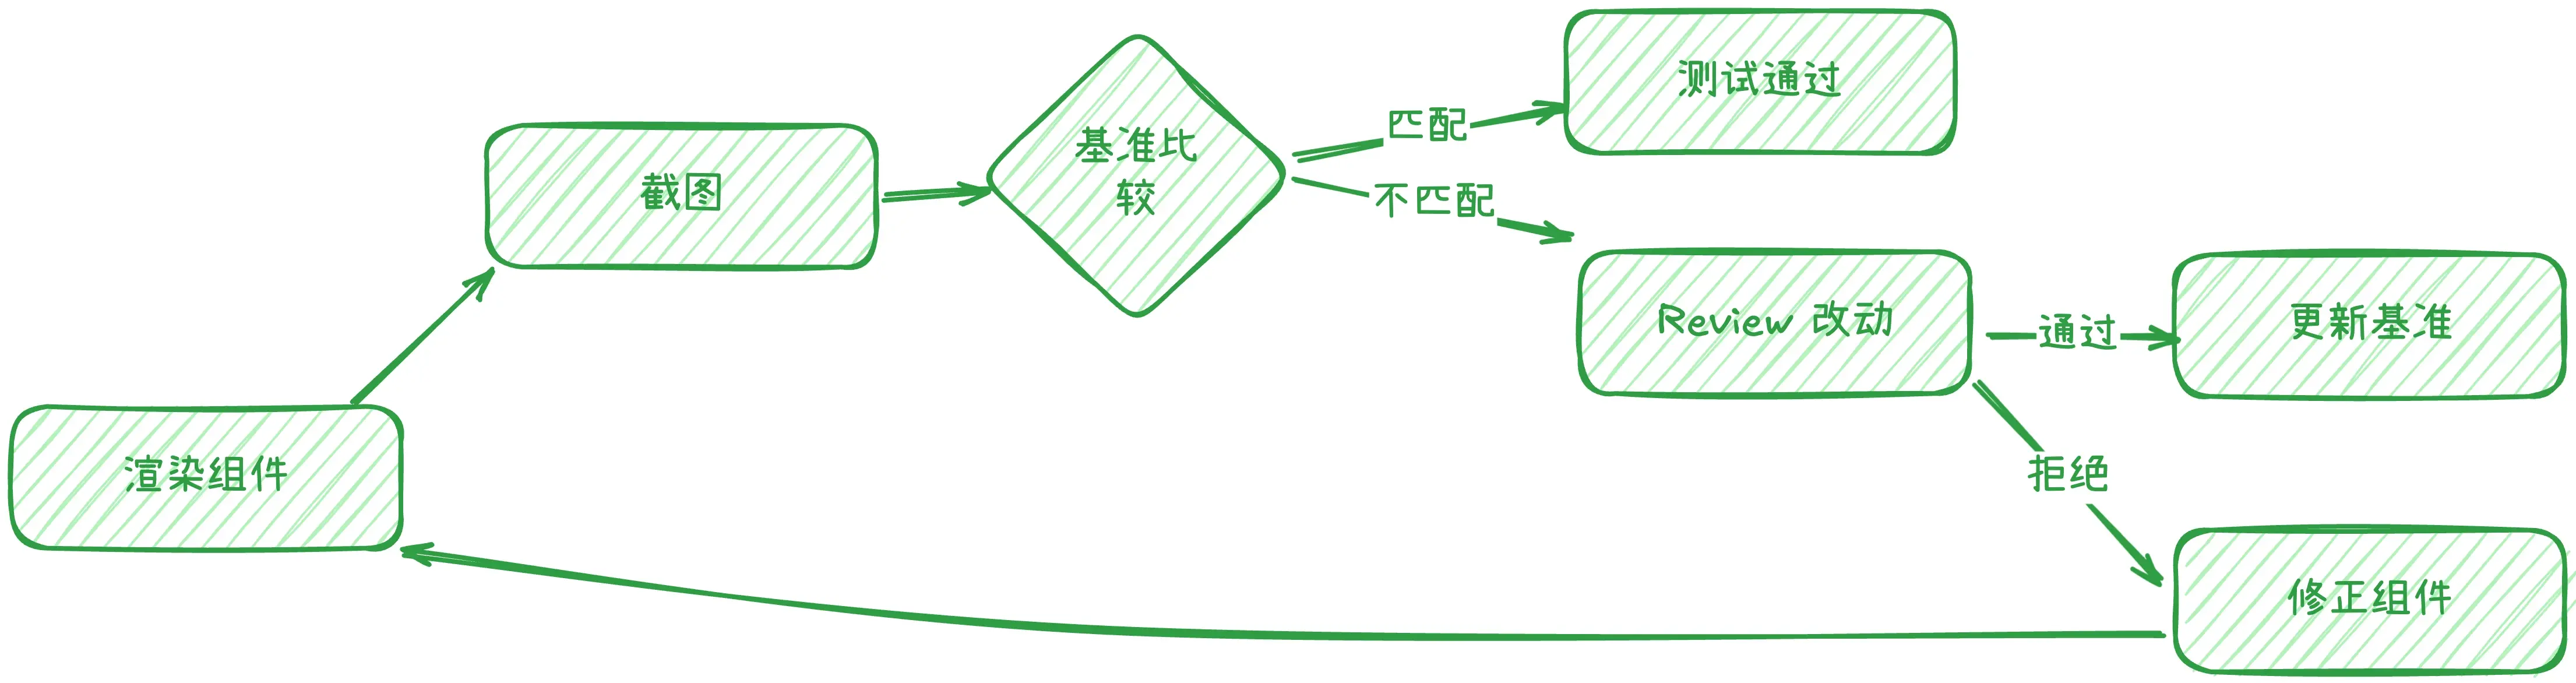
TL;DR: 视觉回归测试通过比较屏幕截图来检测意外的 UI 更改。借助 Vitest 的实验性浏览器模式和 Playwright,您可以:
- 在真实浏览器环境中运行测试
- 为不同状态定义组件 stories
- 捕获屏幕截图并使用快照测试将其与基线图像进行比较
在本指南中,您将学习如何使用 Vitest 为 Vue 组件设置视觉回归测试。
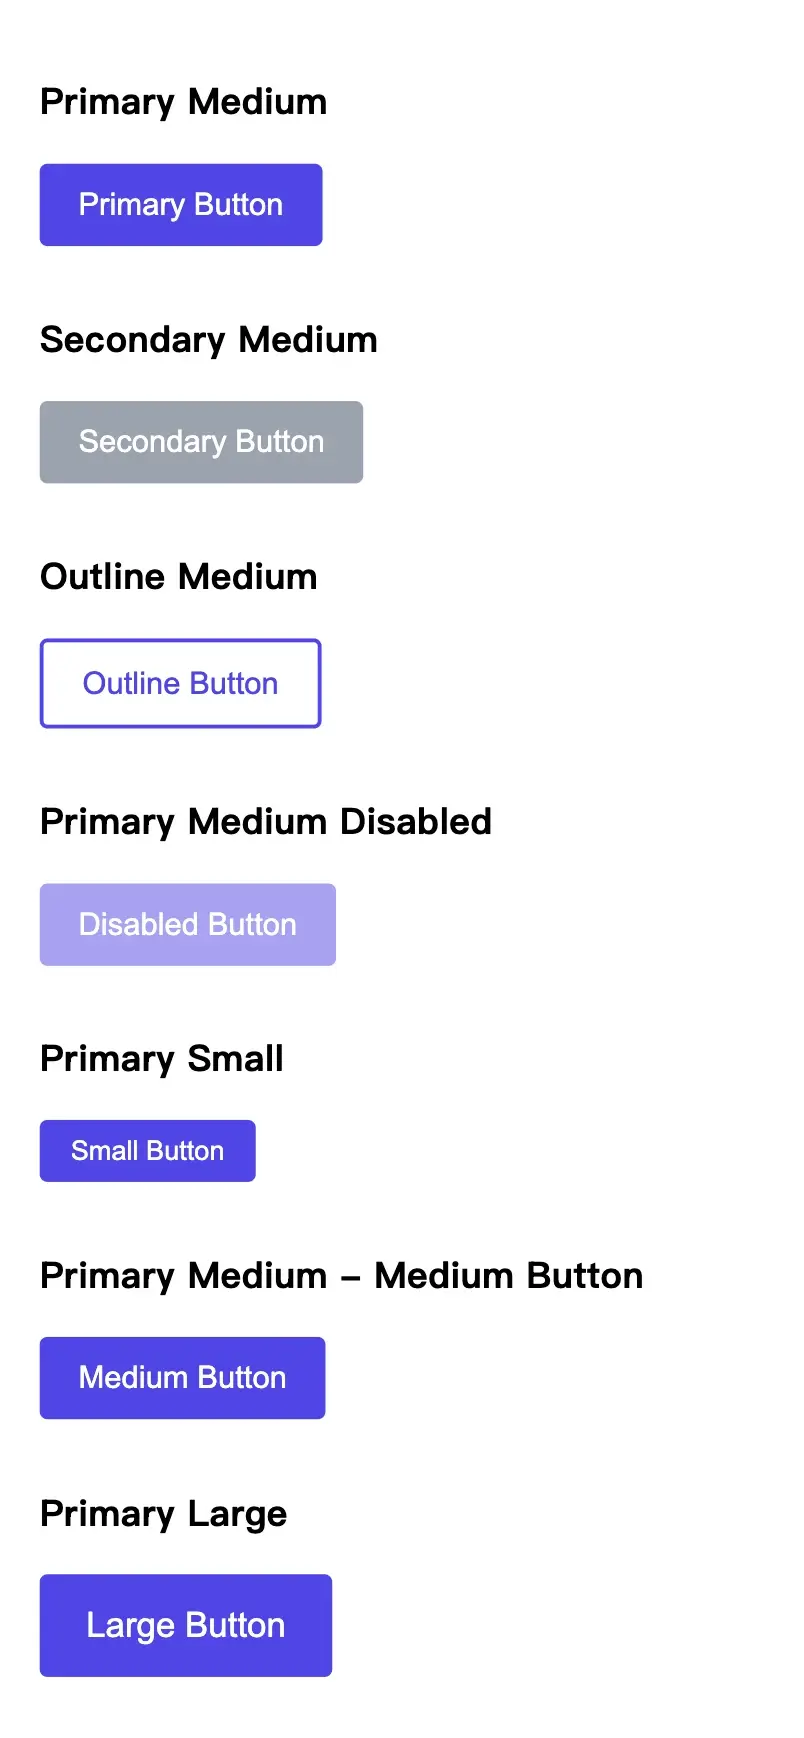
我们的测试将生成以下截图:
视觉回归测试会捕获 UI 组件的屏幕截图,并将其与基线图像进行比较,以标记视觉差异。这可确保整个设计系统的样式和布局保持一致。
Vitest 配置
首先使用 Vue 插件配置 Vitest:
import vue from '@vitejs/plugin-vue'
import { defineConfig } from 'vitest/config'

export default defineConfig({
    plugins: [vue()],
})
设置浏览器测试
视觉回归测试需要真实的浏览器环境。安装以下依赖项:
npm install -D vitest @vitest/browser playwright
您也可以使用以下命令来初始化浏览器模式:
npx vitest init browser
原作者没有提到的需要安装的包
npm i -D jsdom @types/jsdom @vue/test-utils
首先,使用工作区文件vitest.workspace.ts配置 Vitest 以支持单元测试和浏览器测试。有关工作区配置的更多详细信息,请参阅Vitest 工作区文档。
使用工作区配置,您可以为单元测试和浏览器测试保留单独的设置,同时共享通用配置。这样可以更轻松地管理项目中的不同测试环境。
import { defineWorkspace } from 'vitest/config'

export default defineWorkspace([
    {
        extends: './vitest.config.ts',
        test: {
            name: 'unit',
            include: ['**/*.spec.ts', '**/*.spec.tsx'],
            exclude: ['**/*.browser.spec.ts', '**/*.browser.spec.tsx'],
            environment: 'jsdom',
        },
    },
    {
        extends: './vitest.config.ts',
        test: {
            name: 'browser',
            include: ['**/*.browser.spec.ts', '**/*.browser.spec.tsx'],
            browser: {
                enabled: true,
                provider: 'playwright',
                headless: true,
                instances: [{ browser: 'chromium' }],
            },
        },
    },
])
在package.json中添加脚本
{
  "scripts": {
    "test": "vitest",
    "test:unit": "vitest --project unit",
    "test:browser": "vitest --project browser",
  },
}
现在我们可以在单独的环境中运行测试,如下所示:
npm run test:unit
npm run test:browser
BaseButton 组件
将BaseButton.vue组件视为一个可重复使用的按钮,具有可自定义的大小、变体和禁用状态:
完整代码查看github
<script setup lang="ts">
interface Props {
    size?: 'small' | 'medium' | 'large'
    variant?: 'primary' | 'secondary' | 'outline'
    disabled?: boolean
}

defineProps<Props>()
defineEmits<{
    (e: 'click', event: MouseEvent): void
}>()
</script>

<template>
    <button
        class="button" :class="[
            `button--${size}`,
            `button--${variant}`,
            { 'button--disabled': disabled },
        ]"
        :disabled="disabled"
        @click="$emit('click', $event)"
    >
        <slot />
    </button>
</template>

<style scoped lang="scss">
.button {
    display: inline-flex;
    align-items: center;
    justify-content: center;
    /* Additional styling available in the GitHub repository */
}

/* Size, variant, and state modifiers available in the GitHub repository */
</style>
定义测试故事
创建“故事”来展示不同的按钮配置:
const buttonStories = [
    {
        name: 'Primary Medium',
        props: { variant: 'primary', size: 'medium' },
        slots: { default: 'Primary Button' },
    },
    {
        name: 'Secondary Medium',
        props: { variant: 'secondary', size: 'medium' },
        slots: { default: 'Secondary Button' },
    },
    // and much more ...
]
每个故事都定义了一个名称、道具和槽点内容。
为渲染故事截图
在一个容器中渲染所有故事以捕获全面的屏幕截图:
import type { Component } from 'vue'

interface Story<T> {
    name: string
    props: Record<string, any>
    slots: Record<string, string>
}

function renderStories<T>(component: Component, stories: Story<T>[]): HTMLElement {
    const container = document.createElement('div')
    container.style.display = 'flex'
    container.style.flexDirection = 'column'
    container.style.gap = '16px'
    container.style.padding = '20px'
    container.style.backgroundColor = '#ffffff'

    stories.forEach((story) => {
        const storyWrapper = document.createElement('div')
        const label = document.createElement('h3')
        label.textContent = story.name
        storyWrapper.appendChild(label)

        const { container: storyContainer } = render(component, {
            props: story.props,
            slots: story.slots,
        })
        storyWrapper.appendChild(storyContainer)
        container.appendChild(storyWrapper)
    })

    return container
}
编写可视化回归测试
编写一个测试来呈现故事并捕获屏幕截图:
import type { Component } from 'vue'

import { page } from '@vitest/browser/context'
import { describe, expect, it } from 'vitest'
import { render } from 'vitest-browser-vue'

import BaseButton from '../BaseButton.vue'

// [buttonStories and renderStories defined above]
describe('BaseButton', () => {
    describe('visual regression', () => {
        it('should match all button variants snapshot', async () => {
            const container = renderStories(BaseButton, buttonStories)
            document.body.appendChild(container)

            const screenshot = await page.screenshot({
                path: 'all-button-variants.png',
            })

            // this assertion is acutaly not doing anything
            // but otherwise you would get a warning about the screenshot not being taken
            expect(screenshot).toBeTruthy()

            document.body.removeChild(container)
        })
    })
})
使用 vitest-browser-vue 的 render 来捕获在真实浏览器中出现的组件。
使用.browser.spec.ts扩展名(例如BaseButton.browser.spec.ts)保存此文件以匹配您的浏览器测试配置。
超越截图:自动比较
通过以 base64 形式编码屏幕截图并将其与基线快照进行比较来自动进行图像比较:
// Helper function to take and compare screenshots
async function takeAndCompareScreenshot(name: string, element: HTMLElement) {
    const screenshotDir = './__screenshots__'
    const snapshotDir = './__snapshots__'
    const screenshotPath = `${screenshotDir}/${name}.png`

    // Append element to body
    document.body.appendChild(element)

    // Take screenshot
    const screenshot = await page.screenshot({
        path: screenshotPath,
        base64: true,
    })

    // Compare base64 snapshot
    await expect(screenshot.base64).toMatchFileSnapshot(`${snapshotDir}/${name}.snap`)

    // Save PNG for reference
    await expect(screenshot.path).toBeTruthy()

    // Cleanup
    document.body.removeChild(element)
}
然后更新测试:
describe('BaseButton', () => {
    describe('visual regression', () => {
        it('should match all button variants snapshot', async () => {
            const container = renderStories(BaseButton, buttonStories)
            await expect(
                takeAndCompareScreenshot('all-button-variants', container)
            ).resolves.not.toThrow()
        })
    })
})
Vitest 正在讨论浏览器模式下的原生屏幕截图比较。请关注github.com/vitest-dev/vitest/discussions/690并做出贡献。
小结
Vitest 的实验性浏览器模式使开发人员能够在真实的浏览器环境中对 Vue 组件进行准确的视觉回归测试。虽然当前的工作流程需要手动审查屏幕截图比较,但它为未来更自动化的视觉测试奠定了基础。这种方法还加强了开发人员和 UI 设计师之间的协作。设计师可以通过访问组件库中生成的屏幕截图,在生产部署之前查看组件的视觉变化。对于高级视觉测试功能,团队应该探索 Playwright 或 Cypress 等提供更多功能和成熟度的专用工具。请记住对您的基本组件执行视觉回归测试。
评论区
评论加载中...