
原文地址:Atomic Architecture: Revolutionizing Vue and Nuxt Project Structure,作者是Alex,一位来自德国的开发人员。在 25 年的 Vue Nation 上有演讲。
简介
清晰的写作需要清晰的思考。这同样适用于编码。在启动个人项目时,将所有组件放入一个文件夹可能会起作用。但随着项目的增长,尤其是对于较大的团队,这种方法会导致问题:
- 重复的代码
- 超大的多用途组件
- 难以测试的代码
Atomic Design 提供了一个解决方案。让我们看看如何将其应用于 Nuxt 项目。
什么是原子设计
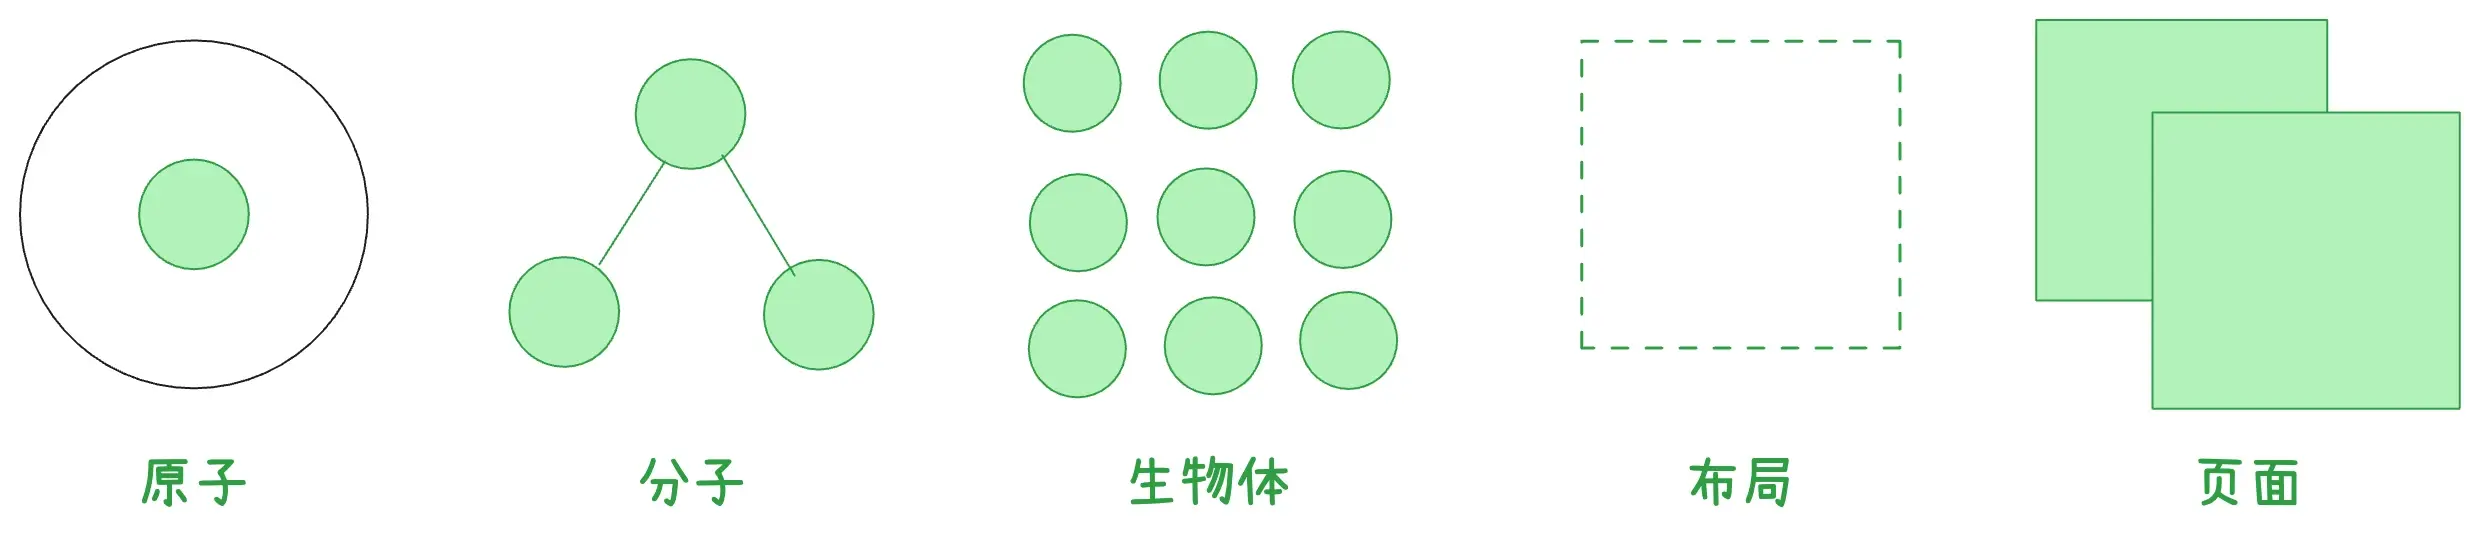
Brad Frost 开发了 Atomic Design 作为创建设计系统的方法。它分为五个级别,灵感来自化学:
- 原子:基本构建块(例如表单标签、输入、按钮)
- 分子:简单的 UI 元素组(例如搜索表单)
- 生物体:由分子/原子制成的复杂成分(例如头部)
- 模板:页面级布局
- 页面:包含内容的模板的特定实例
提醒
为了更好地探索原子设计原则,我建议阅读 Brad Frost 的博客文章:原子 Web 设计
对于 Nuxt,我们可以调整这些定义:
- 原子:纯净的单一用途组件
- 分子:具有最小逻辑的原子组合
- 生物体:更大的、独立的、可重复使用的组件
- 模板:定义页面结构的 Nuxt 布局
- 页面:处理数据和 API 调用的组件
生物体与分子:有什么区别?
分子和生物体可能会令人困惑。以下是考虑它们的简单方法:
- 分子小而简单。它们就像乐高积木,可以卡在一起。例子:
- 搜索栏(输入 + 按钮)
- 登录表单(用户名输入 + 密码输入 + 提交按钮)
- 星级评定(5 个星形图标 + 评定量编号)
- 生物体更大、更复杂。它们就像预先构建的乐高套装。例子:
- 完整的网站标题(徽标 + 导航菜单 + 搜索栏)
- 商品卡(图片 + 标题 + 价格 + 加入购物车按钮)
- 评论部分(评论表单 + 评论列表)
请记住:分子是生物体的一部分,但生物体可以独立工作。
代码示例:之前和之后
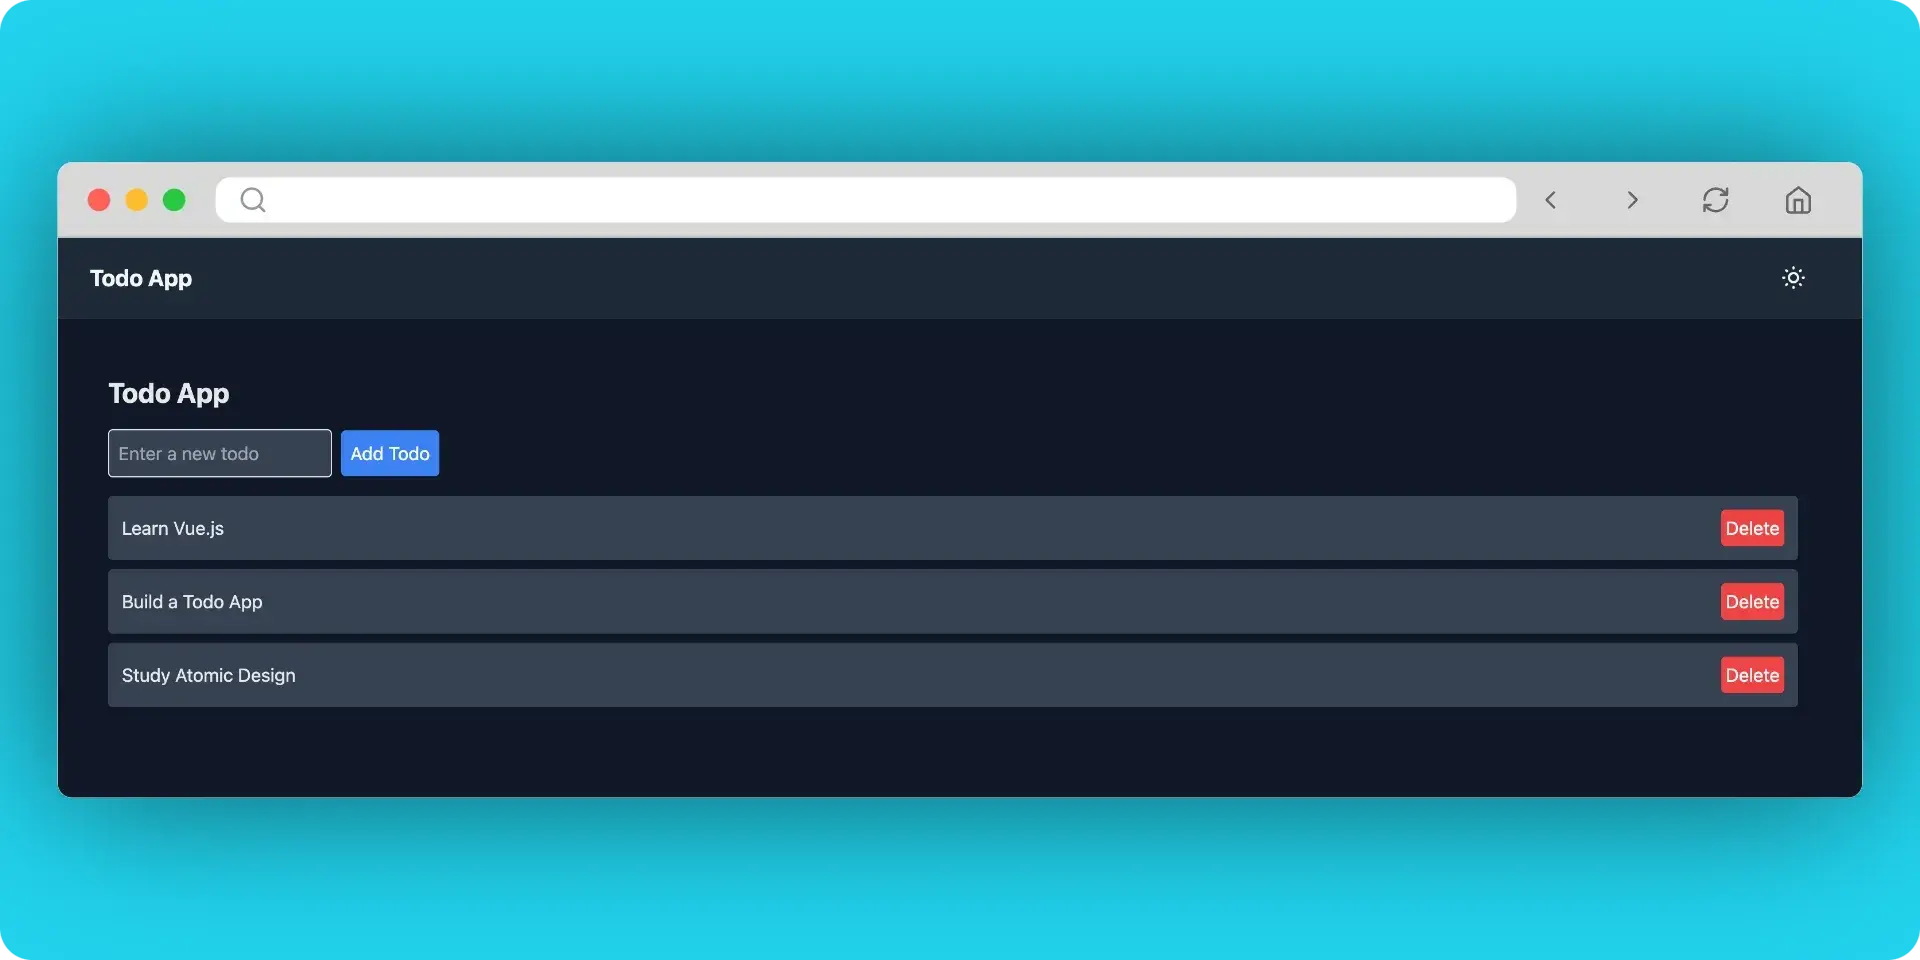
考虑这个非 Atomic Design 待办事项应用程序组件
<script setup lang="ts">
import { onMounted, ref } from 'vue'

interface Todo {
    id: number
    text: string
}

const newTodo = ref('')
const todos = ref<Todo[]>([])

async function fetchTodos() {
    // Simulating API call
    todos.value = [
        { id: 1, text: 'Learn Vue.js' },
        { id: 2, text: 'Build a Todo App' },
        { id: 3, text: 'Study Atomic Design' }
    ]
}

async function addTodo() {
    if (newTodo.value.trim()) {
    // Simulating API call
        const newTodoItem: Todo = {
            id: Date.now(),
            text: newTodo.value
        }
        todos.value.push(newTodoItem)
        newTodo.value = ''
    }
}

async function deleteTodo(id: number) {
    // Simulating API call
    todos.value = todos.value.filter(todo => todo.id !== id)
}

onMounted(fetchTodos)
</script>

<template>
    <div class="container mx-auto p-4">
        <h1 class="text-2xl font-bold mb-4 text-gray-800 dark:text-gray-200">
            Todo App
        </h1>

        <!-- Add Todo Form -->
        <form class="mb-4" @submit.prevent="addTodo">
            <input
                v-model="newTodo"
                type="text"
                placeholder="Enter a new todo"
                class="border p-2 mr-2 bg-white dark:bg-gray-700 text-gray-800 dark:text-gray-200 rounded"
            >
            <button type="submit" class="bg-blue-500 hover:bg-blue-600 text-white p-2 rounded transition duration-300">
                Add Todo
            </button>
        </form>

        <!-- Todo List -->
        <ul class="space-y-2">
            <li
                v-for="todo in todos"
                :key="todo.id"
                class="flex justify-between items-center p-3 bg-gray-100 dark:bg-gray-700 rounded shadow-sm"
            >
                <span class="text-gray-800 dark:text-gray-200">{{ todo.text }}</span>
                <button
                    class="bg-red-500 hover:bg-red-600 text-white p-1 rounded transition duration-300"
                    @click="deleteTodo(todo.id)"
                >
                    Delete
                </button>
            </li>
        </ul>
    </div>
</template>
这种方法会导致大型、难以维护的组件。让我们使用 Atomic Design 进行重构:
这将是重构的结构
📐 Template (Layout)
   │
   └─── 📄 Page (TodoApp)
        │
        └─── 📦 Organism (TodoList)
             │
             ├─── 🧪 Molecule (TodoForm)
             │    │
             │    ├─── ⚛️ Atom (BaseInput)
             │    └─── ⚛️ Atom (BaseButton)
             │
             └─── 🧪 Molecule (TodoItems)
                  │
                  └─── 🧪 Molecule (TodoItem) [multiple instances]
                       │
                       ├─── ⚛️ Atom (BaseText)
                       └─── ⚛️ Atom (BaseButton)
重构的组件
模板
<script setup lang="ts">
import ThemeToggle from '~/components/ThemeToggle.vue'
</script>

<template>
    <div class="min-h-screen bg-gray-100 dark:bg-gray-900 text-gray-900 dark:text-gray-100 transition-colors duration-300">
        <header class="bg-white dark:bg-gray-800 shadow">
            <nav class="container mx-auto px-4 py-4 flex justify-between items-center">
                <NuxtLink to="/" class="text-xl font-bold">
                    Todo App
                </NuxtLink>
                <ThemeToggle />
            </nav>
        </header>
        <main class="container mx-auto px-4 py-8">
            <slot />
        </main>
    </div>
</template>
页面
<script setup lang="ts">
import { onMounted, ref } from 'vue'

import TodoList from '../components/organisms/TodoList'

interface Todo {
    id: number
    text: string
}

const todos = ref<Todo[]>([])

async function fetchTodos() {
    // Simulating API call
    todos.value = [
        { id: 1, text: 'Learn Vue.js' },
        { id: 2, text: 'Build a Todo App' },
        { id: 3, text: 'Study Atomic Design' }
    ]
}

async function addTodo(text: string) {
    // Simulating API call
    const newTodoItem: Todo = {
        id: Date.now(),
        text
    }
    todos.value.push(newTodoItem)
}

async function deleteTodo(id: number) {
    // Simulating API call
    todos.value = todos.value.filter(todo => todo.id !== id)
}

onMounted(fetchTodos)
</script>

<template>
    <div class="container mx-auto p-4">
        <h1 class="text-2xl font-bold mb-4 text-gray-800 dark:text-gray-200">
            Todo App
        </h1>
        <TodoList
            :todos="todos"
            @add-todo="addTodo"
            @delete-todo="deleteTodo"
        />
    </div>
</template>
生物体 (TodoList)
<script setup lang="ts">
import TodoForm from '../molecules/TodoForm.vue'
import TodoItem from '../molecules/TodoItem.vue'

interface Todo {
    id: number
    text: string
}

defineProps<{
    todos: Todo[]
}>()

defineEmits<{
    (e: 'add-todo', value: string): void
    (e: 'delete-todo', id: number): void
}>()
</script>

<template>
    <div>
        <TodoForm @add-todo="$emit('add-todo', $event)" />
        <ul class="space-y-2">
            <TodoItem
                v-for="todo in todos"
                :key="todo.id"
                :todo="todo"
                @delete-todo="$emit('delete-todo', $event)"
            />
        </ul>
    </div>
</template>
分子(TodoForm 和 TodoItem)
<script setup lang="ts">
import TodoForm from '../molecules/TodoForm.vue'
import TodoItem from '../molecules/TodoItem.vue'

interface Todo {
    id: number
    text: string
}

defineProps<{
    todos: Todo[]
}>()

defineEmits<{
    (e: 'add-todo', value: string): void
    (e: 'delete-todo', id: number): void
}>()
</script>

<template>
    <div>
        <TodoForm @add-todo="$emit('add-todo', $event)" />
        <ul class="space-y-2">
            <TodoItem
                v-for="todo in todos"
                :key="todo.id"
                :todo="todo"
                @delete-todo="$emit('delete-todo', $event)"
            />
        </ul>
    </div>
</template>
<script setup lang="ts">
import { ref } from 'vue'

import BaseButton from '../atoms/BaseButton.vue'
import BaseInput from '../atoms/BaseInput.vue'

const emit = defineEmits<{
    (e: 'add-todo', value: string): void
}>()
const newTodo = ref('')
function addTodo() {
    if (newTodo.value.trim()) {
        emit('add-todo', newTodo.value)
        newTodo.value = ''
    }
}
</script>

<template>
    <form class="mb-4" @submit.prevent="addTodo">
        <BaseInput v-model="newTodo" placeholder="Enter a new todo" />
        <BaseButton type="submit">
            Add Todo
        </BaseButton>
    </form>
</template>
原子(BaseButton, BaseInput, BaseText)
<script setup lang="ts">
defineProps<{
    variant?: 'primary' | 'danger'
}>()
</script>

<template>
    <button
        class="p-2 rounded transition duration-300" :class="[
            variant === 'danger'
                ? 'bg-red-500 hover:bg-red-600 text-white'
                : 'bg-blue-500 hover:bg-blue-600 text-white',
        ]"
    >
        <slot />
    </button>
</template>
<script setup lang="ts">
defineProps<{
    modelValue: string
    placeholder?: string
}>()
defineEmits<{
    (e: 'update:modelValue', value: string): void
}>()
</script>

<template>
    <input
        :value="modelValue"
        type="text"
        :placeholder="placeholder"
        class="border p-2 mr-2 bg-white dark:bg-gray-700 text-gray-800 dark:text-gray-200 rounded"
        @input="$emit('update:modelValue', ($event.target as HTMLInputElement).value)"
    >
</template>
提醒
想亲自查看完整示例吗?点击我
| 组件级别 | 工作 | 示例 |
|---|---|---|
| 原子 | 纯净的单一用途组件 | BaseButton BaseInput BaseIcon BaseText |
| 分子 | 具有最小逻辑的原子组合 | SearchBar LoginForm StarRating Tooltip |
| 生物体 | 更大的、独立的、可重用的组件。可以执行副作用和复杂的作。 | TheHeader ProductCard CommentSection NavigationMenu |
| 模板 | 定义页面结构的 Nuxt 布局 | DefaultLayout BlogLayout DashboardLayout AuthLayout |
| 页面 | 处理数据和 API 调用的组件 | HomePage UserProfile ProductList CheckoutPage |
摘要
原子设计提供了一条通往更明显的代码结构的途径。它可以很好地作为许多项目的起点。但随着复杂性的增加,其他架构可能会更好地为您服务。想要探索更多选项?阅读我的帖子 如何选择 Vue 项目架构.它涵盖了 Atomic Design 之外的方法,当您的项目超出其初始结构时。

评论区
评论加载中...